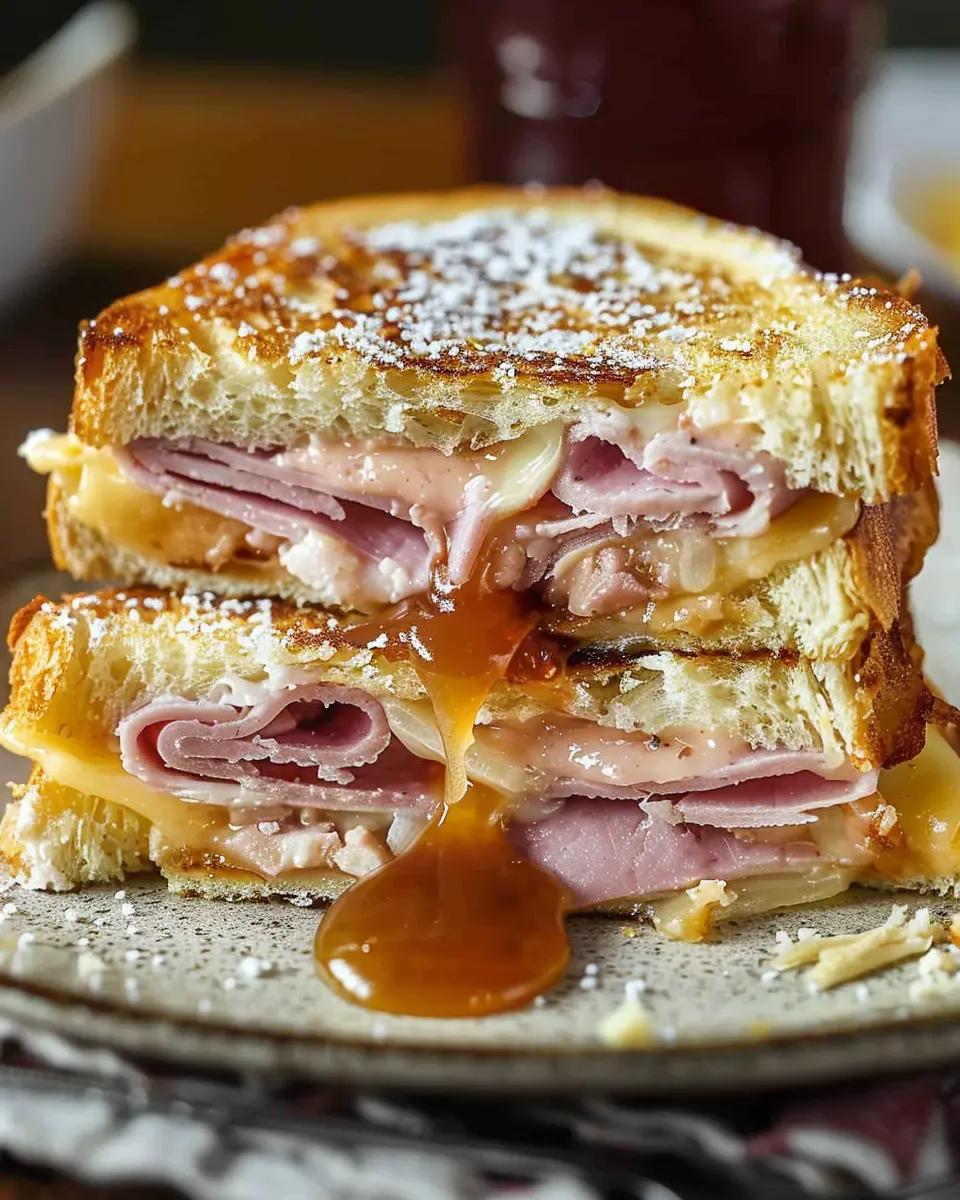
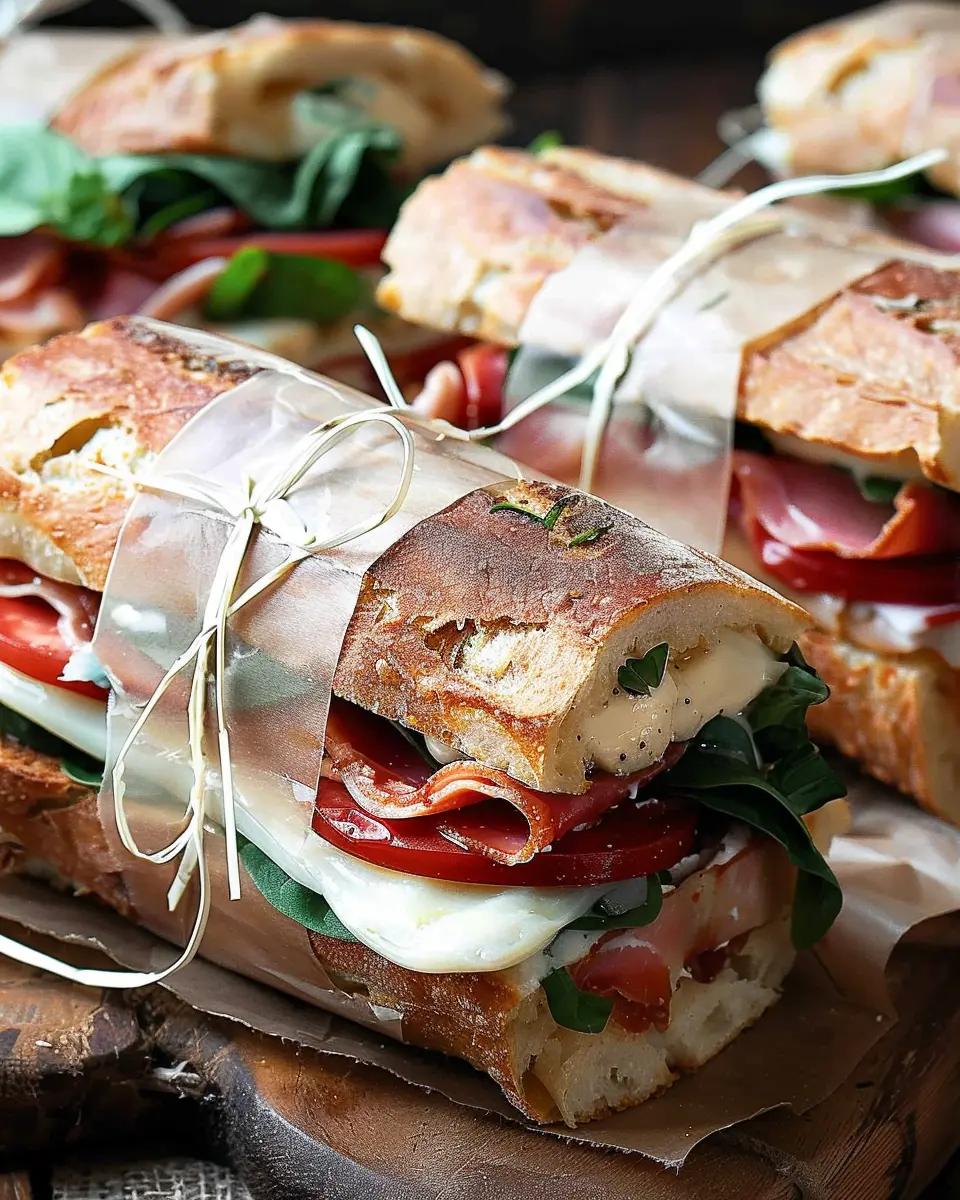
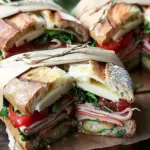
Introduction to Pressed Italian Picnic Sandwiches
Pressed Italian picnic sandwiches are a delightful blend of flavors that can transform any ordinary outing into a gourmet experience. Perfectly portable, these sandwiches are a fantastic option whether you’re headed to a picnic, a beach day, or even a casual office lunch. Imagine layers of succulent chicken ham, smoky turkey bacon, and rich cheeses, all pressed together to create a harmonious taste that’s as simple as it is delicious.
Why you’ll love pressed Italian picnic sandwiches
One of the best things about pressed Italian picnic sandwiches is their versatility. You can easily customize them to match your flavor preferences or dietary restrictions. Want a vegetarian version? Swap in fresh roasted vegetables instead of the meats, or opt for a delightful caprese twist with mozzarella, tomatoes, and basil. Each bite bursts with freshness, making these sandwiches a welcome addition to any outing.
Not to mention, they’re a breeze to prepare. With one quick assembly and a little time spent pressing the sandwiches, you’ll have a meal ready to go that tastes like it’s from a gourmet deli. Plus, they hold up incredibly well in a cooler, so you won’t have to worry about sogginess, as too often happens with regular sandwiches. For an added layer of flavor, consider adding pesto or olive tapenade—these ingredients not only elevate the dish but also bring an authentic Italian flair to your picnic.
Did you know that preparing your own sandwiches can save you up to 60% compared to lunching out? With the rising costs of dining out, whipping up a batch of these Italian-inspired delights is not only more economical but ensures you know exactly what’s going into your meal.
So, whether you’re scouting for easy meal prep ideas or simply looking to impress your friends with a fun culinary creation, pressed Italian picnic sandwiches are the way to go. Discover your new favorite picnic companion that’s both easy to make and sure to satisfy!
For further sandwich inspiration, you might also enjoy checking out The Spruce Eats, which is brimming with creative ideas to take your picnic spread next level.
Ingredients for Pressed Italian Picnic Sandwiches
Creating delicious Pressed Italian Picnic Sandwiches is all about picking the right ingredients that dance together in harmony. Let’s break it down!
Key ingredients you’ll need
To craft your perfect Italian picnic sandwich, gather these essentials:
- Ciabatta bread: Its airy, chewy texture holds up beautifully against pressing.
- Chicken ham: This lean alternative brings a savory richness without overpowering.
- Turkey bacon: Add a crispy, smoky flavor that elevates your sandwich.
- Provolone cheese: Creamy and nutty, it melts perfectly when pressed.
- Roasted red peppers: Sweet and tangy, they add a burst of flavor.
- Fresh basil: Nothing beats the bright, aromatic notes of fresh herbs.
- Olive oil and balsamic vinegar: A drizzle of both brings it all together.
These staples are the backbone of your Pressed Italian Picnic Sandwiches, offering a deliciously satisfying bite.
Optional add-ins and substitutes
Want to personalize your sandwich further? Consider these add-ins:
- Spinach or arugula: Add a healthy green layer for extra crunch.
- Olives or artichokes: For a briny touch that balances the richness.
- Hummus or pesto: Spread some for added moisture and flavor.
Feel free to get creative with your selections or even swap ingredients based on what you have in your pantry. Explore more unique flavor combinations at Food Network or Bon Appétit for fresh ideas. With these tips, your Pressed Italian Picnic Sandwiches will be irresistible!
Step-by-step preparation of Pressed Italian Picnic Sandwiches
Making Pressed Italian Picnic Sandwiches is not only an economical choice for meals on the go, but it’s a delightful way to indulge in bold flavors without spending hours in the kitchen. Let’s dive into this step-by-step guide, ensuring you not only enjoy the process but also the scrumptious results.
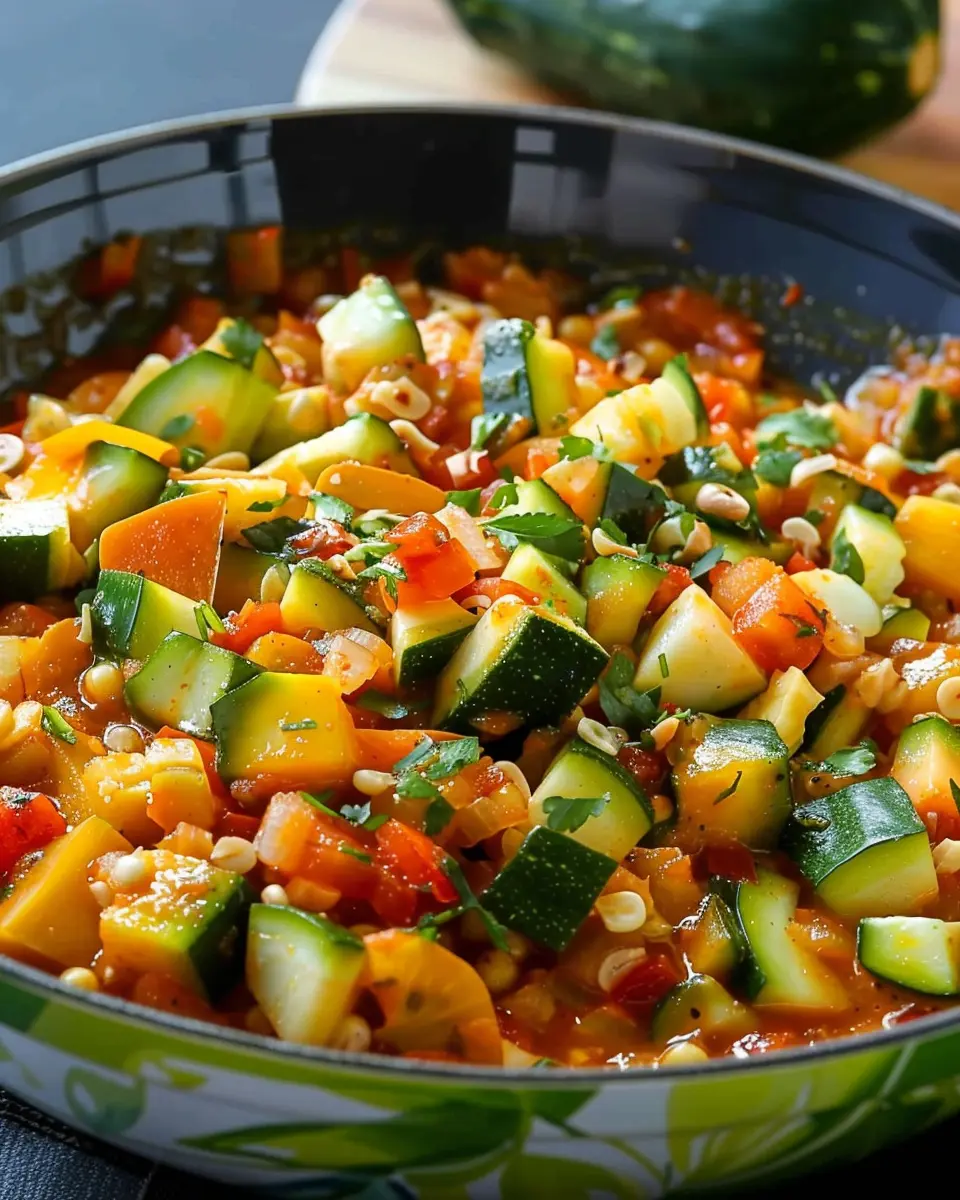
Roast the red peppers
Roasting your red peppers enhances their sweetness and adds a lovely smoky flavor, perfect for your sandwiches. Here’s how you can do it:
- Preheat your oven to 450°F (232°C).
- Wash and core the red peppers. Cut them in half and remove the seeds.
- Arrange the halves cut side down on a baking sheet lined with parchment paper.
- Roast for about 20-25 minutes, or until the skins are charred.
- Remove them from the oven and let them steam in a bowl covered with plastic wrap for about 10 minutes. This will make peeling off the skins much easier.
- Peel the skins off and slice the peppers.
These roasted red peppers add a robust flavor and a pop of color to your Pressed Italian Picnic Sandwiches. For further roasting techniques or tips on vegetable roasting, you can check out this guide from the New York Times Cooking.
Prepare the ciabatta baguette
Now that your red peppers are roaring with flavor, it’s time to choose a sturdy base. Ciabatta baguette is perfect due to its chewy crust and airy interior.
- Buy fresh ciabatta baguettes from your local bakery or grocery store. It’s best to get them the same day to ensure maximum freshness.
- Slice the baguette open, cutting it horizontally to create a top and bottom. Be careful not to slice all the way through; you just want to hinge the sandwich open.
- For an extra crunch, you might want to lightly toast the insides in a pan or under a broiler for a few minutes until they’re golden brown.
A crispy base sets an excellent stage for the ingredients to shine in your Pressed Italian Picnic Sandwiches!
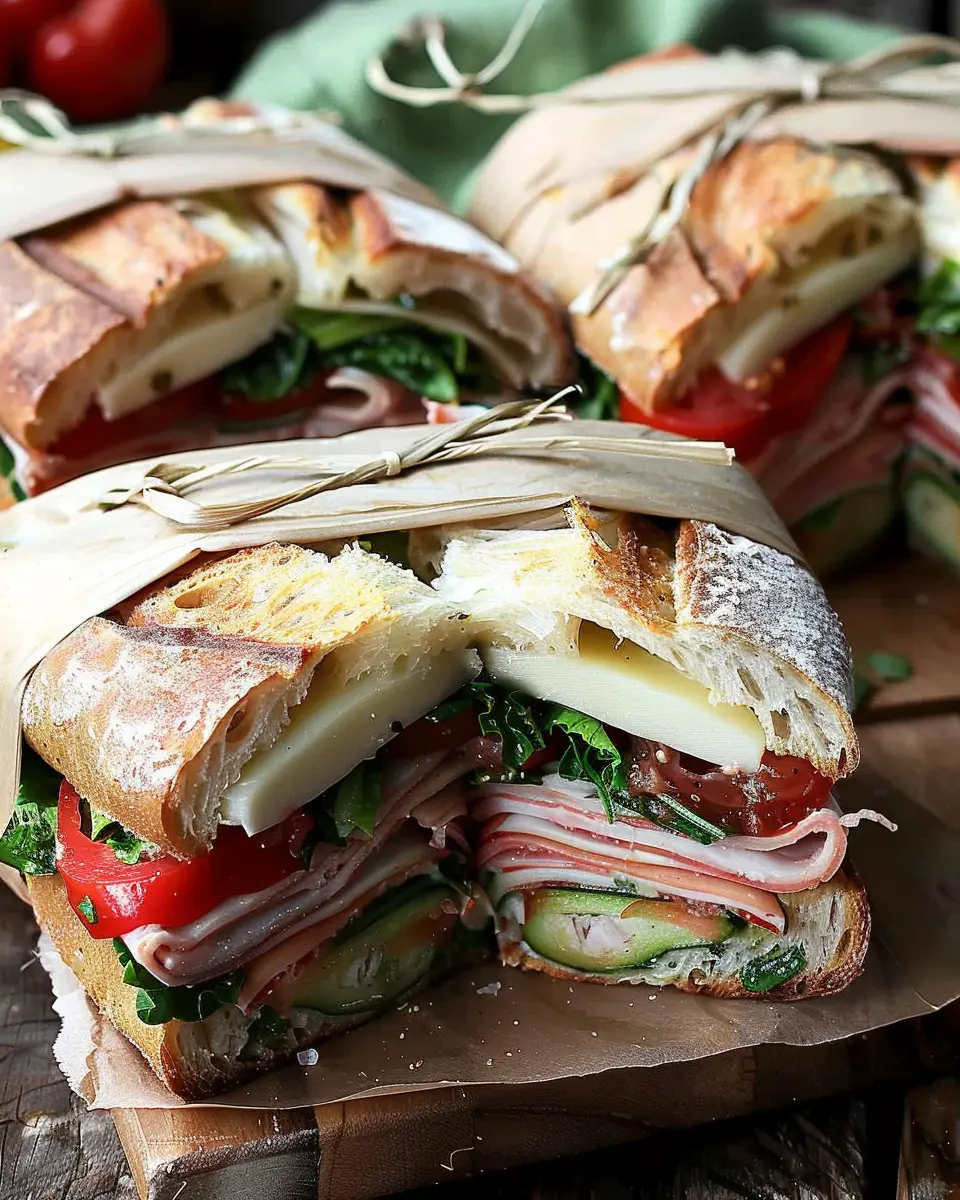
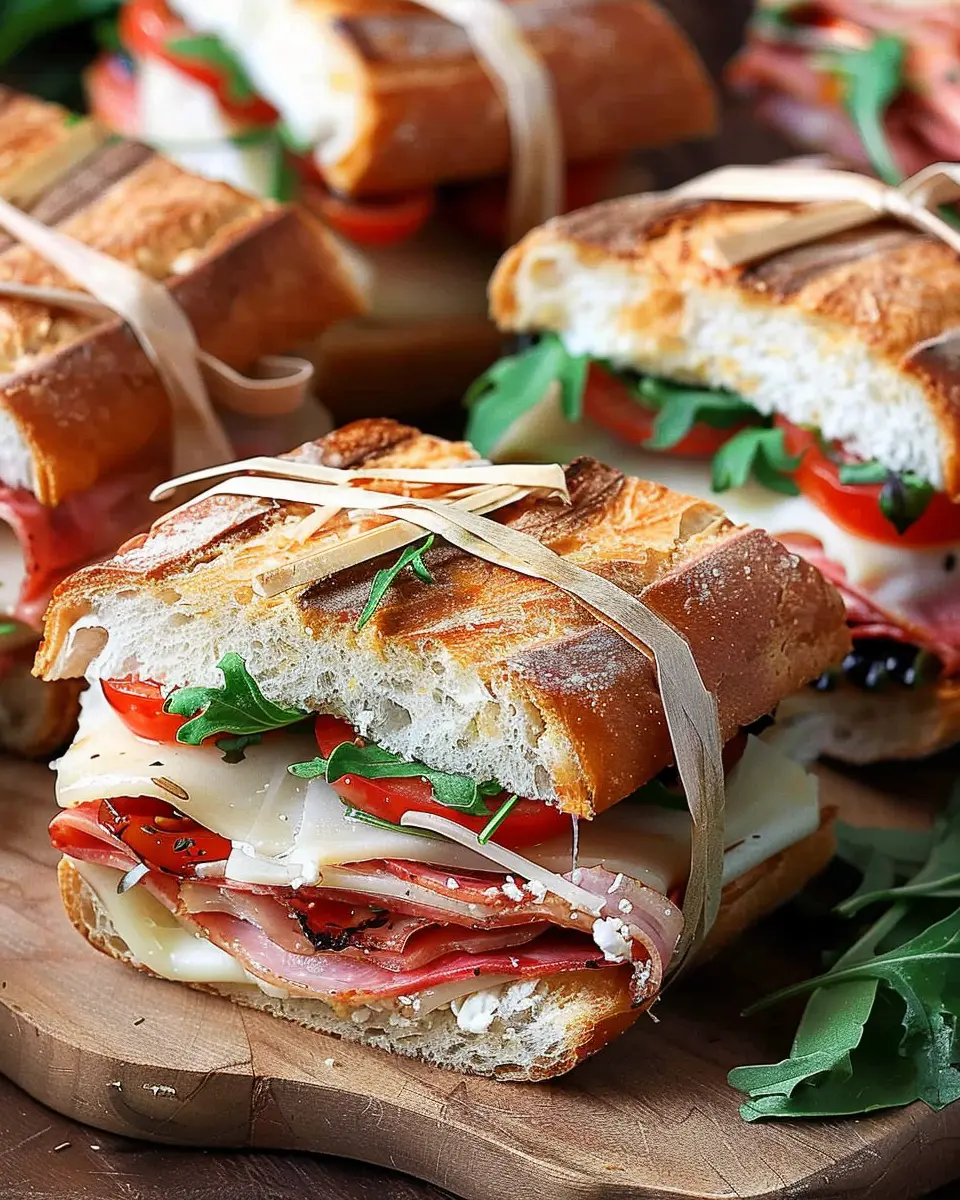
Assemble the sandwich layers
Now comes the fun part—layering the sandwich! Adding a variety of flavors and textures is key:
- Start with a generous layer of spread—you can use pesto, mayo, or a simple olive oil drizzle.
- Next, layer in your chicken ham and turkey bacon for a savory kick.
- Add a hearty portion of roasted red peppers.
- Top with a handful of fresh arugula or spinach for that crunchy, peppery flavor.
- Finish it off with slices of fresh mozzarella or provolone cheese; the creaminess balances everything perfectly.
Feel free to customize with additional ingredients like sun-dried tomatoes or olives. The more colorful, the better!
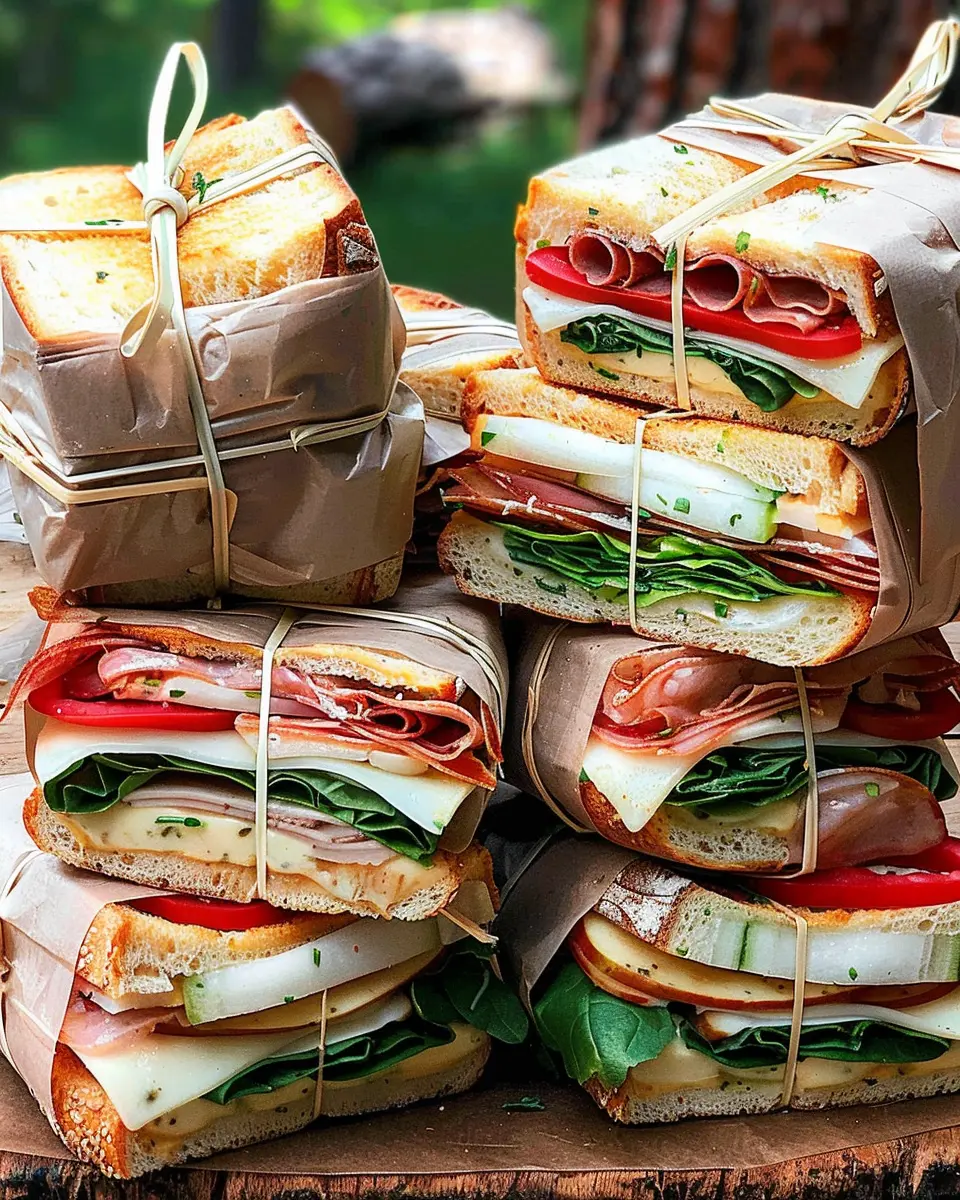
Wrap and press the sandwiches
To truly embody the pressed nature of these sandwiches, you’ll want to wrap them tightly and weigh them down.
- Wrap each sandwich tightly in parchment paper or plastic wrap.
- Place them in a heavy skillet or a pan and put a weight (like a few cans or a heavy pan) on top. This will flatten the sandwich slightly and meld the flavors together beautifully.
- Let them sit for about 30 minutes at room temperature. If you’re preparing for a picnic, you can pop them in the refrigerator to enhance the flavors further.
Pressing the sandwiches might seem like an optional step, but it makes a significant difference in taste and texture.
Chill and serve
Now that your sandwiches are pressed, it’s time to let them chill out.
- Refrigerate the sandwiches for at least an hour, or even overnight for a flavor boost.
- When you’re ready to serve, unwrap and slice them into convenient portions.
These Pressed Italian Picnic Sandwiches are perfect for outings or as grab-and-go lunches. Pair them with fresh fruit or a light salad, and you’ve got a delightful meal ready to impress. Happy eating!
Variations on Pressed Italian Picnic Sandwiches
When it comes to Pressed Italian Picnic Sandwiches, the beauty is in the versatility. You can easily customize these to suit different diets and tastes. Let’s explore a couple of delicious variations that will ensure everyone at your picnic can indulge!
Vegetarian Pressed Sandwich Option
If you’re planning a picnic with vegetarian friends or simply want to create a lighter option, consider a vegetarian pressed sandwich. Here’s how:
- Base Ingredients: Start with some hearty ciabatta or focaccia bread.
- Filling Choices: Layer roasted red peppers, marinated artichokes, fresh mozzarella, and a handful of spinach or arugula.
- Seasoning: Drizzle with a balsamic glaze and a sprinkle of Italian herbs for that authentic touch.
Not only does this vegetarian version pack plenty of flavor, but it’s also a colorful addition that complements the classic meat-filled sandwiches beautifully.
Gluten-Free Alternatives
For those who need to steer clear of gluten, there are plenty of accessible options for creating pressed Italian picnic sandwiches. Look for gluten-free bread available in most supermarkets or consider using lettuce wraps for a fun twist. Here’s a quick guide:
- Bread Choices: Gluten-free ciabatta or sourdough can work wonders.
- Protein Variants: Opt for chicken ham or turkey bacon, adding layers of flavor and sustenance.
- Extra Toppings: Don’t hold back on the veggies. Tomatoes, cucumbers, and fresh herbs can elevate your sandwich without gluten.
For more tips on creating delicious and inclusive meals, check out the Gluten Intolerance Group for expert insights.
By including these variations in your picnic, you ensure that everyone can revel in the joy of a satisfying pressed sandwich. Happy picnicking!
Cooking tips and notes for Pressed Italian Picnic Sandwiches
Best practices for roasting peppers
Roasting peppers can elevate your Pressed Italian Picnic Sandwiches to a whole new level. Here’s how to do it like a pro:
- Choose fresh, vibrant peppers: Opt for bell peppers in various colors—red, yellow, and orange add a touch of sweetness.
- Preheat your oven: Set it to 425°F (220°C) for an evenly roasted finish.
- Prep the peppers: Cut them in half, remove the seeds, and coat with a little olive oil and seasoning.
- Roast until charred: Place them on a baking sheet, skin side up, and roast for about 20-25 minutes until the skins blister and blacken.
Interested in expert tips on roasting? Check out resources from the California Bell Pepper Commission.
Tips for using leftovers
Got some ingredients left over? Don’t waste them! They can enhance your sandwiches in creative ways:
- Sandwich variety: Use leftover roasted peppers, chicken ham, or turkey bacon in wraps or salads for easy meals.
- Creative spreads: Blend leftover roasted peppers into a cream cheese or hummus spread for a zesty dip.
- Soups and sides: Toss any remaining ingredients into a soup or on the side of your favorite pasta to make the most of your meal prep.
Using leftovers cuts down on waste and adds a personal touch to your Pressed Italian Picnic Sandwiches. Who knew being sustainable could taste so good?
Serving Suggestions for Pressed Italian Picnic Sandwiches
Pairing with Sides and Dips
When it comes to enjoying your Pressed Italian Picnic Sandwiches, the right sides can really elevate your meal. Consider serving these delicious creations alongside:
- Crusty Bread Sticks: Perfect for dipping and adds a crunchy texture.
- Homemade Bruschetta: Fresh tomatoes, basil, and garlic on grilled bread harmonize beautifully with the rich flavors of the sandwiches.
- Caprese Salad: This simple salad of fresh mozzarella, tomatoes, and basil is refreshing and complements the savory notes of the sandwiches.
For dipping, try a zesty homemade aioli or a tangy balsamic reduction. Both add layers of flavor that your guests will love!
Ideal Occasions to Serve
Pressed Italian Picnic Sandwiches are versatile enough for various occasions. Think about:
- Picnics: Easily portable, these sandwiches make for a perfect park lunch with friends.
- Game Days: Serve them during the big game; they’re convenient for sharing and eating, while still being unique.
- Casual Gatherings: Whether it’s a brunch or a casual dinner, these sandwiches will surely impress your guests without requiring too much fuss.
No matter the occasion, Pressed Italian Picnic Sandwiches are sure to be a hit! To learn more about entertaining, check out this guide from The Spruce Eats.
Time Breakdown for Pressed Italian Picnic Sandwiches
When you’re planning a picnic, knowing how much time to allocate for Pressed Italian Picnic Sandwiches can streamline your preparation. Let’s break it down so you can maximize your time enjoying the outdoors!
Preparation Time
You’ll need about 15 minutes to gather all your ingredients, slice the bread, and layer in your fillings. The combination of Turkey Bacon, Chicken Ham, and rich cheeses requires just a little love and attention to detail.
Cooking Time
While these sandwiches don’t technically require cooking in the traditional sense, you’ll want to press them for about 20 minutes. This process melds all the flavors beautifully and creates that perfect, crunchy exterior.
Total Time
In total, you’re looking at roughly 35 minutes from start to finish. It’s the perfect amount of time to whip up a batch of these hearty sandwiches so you’ll be ready for adventure in no time!
For more tips on efficiently prepping for picnics, check out this helpful guide on meal planning from The Kitchn. Planning ahead really is the key to enjoying your outdoor meals!
Nutritional facts for Pressed Italian Picnic Sandwiches
Calories per serving
When it comes to keeping your meals satisfying yet mindful of calorie counts, Pressed Italian Picnic Sandwiches strike a great balance. Each serving clocks in at approximately 350 calories, making it a tasty option for lunch or a light dinner without blowing your daily caloric intake.
Macronutrient breakdown
Diving deeper into the nutrition, here’s how the macronutrients stack up:
- Protein: About 20 grams, thanks to the inclusion of Turkey Bacon and Chicken Ham, which provide a savory protein kick.
- Fat: Approximately 15 grams, primarily from cheese and olive oil, giving that delicious richness.
- Carbohydrates: Around 40 grams, mainly from the whole grain bread, offering fiber and energy for your afternoon activities.
Enjoying these Pressed Italian Picnic Sandwiches not only satisfies your taste buds but also contributes positively to your nutritional goals. For more information on balanced eating, the USDA’s MyPlate is a fantastic resource for understanding portions and nutrition. So go ahead, relish these sandwiches guilt-free!
FAQs about Pressed Italian Picnic Sandwiches
Can I make these sandwiches in advance?
Absolutely! Pressed Italian Picnic Sandwiches are a fantastic option for meal prep. You can make them up to 24 hours in advance, allowing the flavors to meld together beautifully. After assembling, just wrap them tightly in plastic wrap or parchment paper. This keeps them fresh and helps to compress the ingredients, enhancing that delightful pressed effect.
What’s the best way to store leftovers?
If you do have leftovers, you can store them in an airtight container in the refrigerator for up to three days. Make sure to separate any additional condiment packets if you’ve added them, as they can make bread soggy. When you’re ready to enjoy your sandwich again, a quick re-press on a skillet can revive that fresh, crunchy texture, making those leftovers even more delicious.
What can I customize in the recipe?
Customization is where Pressed Italian Picnic Sandwiches shine! Feel free to swap out the proteins—try using turkey bacon or chicken ham for a twist. You can also experiment with different cheeses like provolone or mozzarella, and throw in your favorite veggies, such as roasted red peppers or artichokes. Don’t forget to play around with spreads, too! Try pesto, sun-dried tomato spread, or even a tangy mustard for an extra zing.
For more inspiration, check out this guide on creating scrumptious sandwiches that suit your taste. The possibilities are endless, so get creative and make it your own!
Conclusion on Pressed Italian Picnic Sandwiches
In the world of homemade sandwiches, Pressed Italian Picnic Sandwiches stand out as the perfect blend of flavor and convenience. These beauties not only cater to your taste buds but also bring a sense of creativity to your meal prep. Whether you’re gearing up for a picnic in the park or simply enjoying a leisurely lunch at home, making your own sandwiches can be an exciting culinary adventure.
Plus, crafting your sandwiches allows you to control quality ingredients, ensuring a healthier option without compromising on taste. So, gather your friends, pack a cooler, and take your pressed sandwiches on the go. You won’t just be enjoying a meal; you’ll be sharing an experience. For tips on selecting the finest ingredients, check out resources like the Fresh Produce Association and USDA. Happy sandwich making!
PrintPressed Italian Picnic Sandwiches: Easy Recipe with Turkey Bacon and Chicken Ham
Delight in these pressed Italian picnic sandwiches featuring turkey bacon and chicken ham, perfect for your next gathering!
- Prep Time: 15 minutes
- Cook Time: 10 minutes
- Total Time: 25 minutes
- Yield: 4 servings 1x
- Category: Sandwich
- Method: Grilling
- Cuisine: Italian
- Diet: Omnivore
Ingredients
- 8 slices ciabatta bread
- 4 ounces turkey bacon
- 4 ounces chicken ham
- 4 ounces provolone cheese
- 1/4 cup pesto
- 1 tablespoon olive oil
- 1/2 teaspoon salt
- 1/2 teaspoon black pepper
Instructions
- Preheat your panini press or grill.
- Spread pesto on one side of each ciabatta slice.
- Layer turkey bacon, chicken ham, and provolone cheese on four slices of bread.
- Top with the remaining bread slices, pesto side down.
- Brush the outside of the sandwiches with olive oil and season with salt and pepper.
- Press in the panini press or grill until golden and crispy.
- Cut in half and serve warm.
Notes
- For extra flavor, add roasted red peppers or spinach.
- These sandwiches can be made ahead of time and pressed when ready to serve.
Nutrition
- Serving Size: 1 sandwich
- Calories: 450
- Sugar: 3g
- Sodium: 800mg
- Fat: 25g
- Saturated Fat: 10g
- Unsaturated Fat: 12g
- Trans Fat: 0g
- Carbohydrates: 40g
- Fiber: 2g
- Protein: 25g
- Cholesterol: 60mg
Keywords: Pressed Italian Picnic Sandwiches, Sandwiches, Easy Recipe